Google Authenticator SSH CentOS7
Cấu hình Google Authenticator SSH trên CentOS 7
Để tăng cường tính an toàn và bảo mật cho server của bạn, Google Authenticator là một lựa chọn tuyệt vời bởi nó cung cấp xác thực 2 lớp khi bạn muốn vào hệ thống.
1. Xác thực hai lớp (2FA)
2FA (Two – Factor Authentication) được gọi là xác thực hai yếu tố hay hai lớp. Để vào được hệ thống thì ta cần xác minh danh tính gồm có user và pasword. Khi đã sử dụng 2FA ta sẽ cần phải cung cấp thêm một yếu tố để xác minh danh tính.
Việc sử dụng 2FA có thể có một chút rắc rối khi sử dụng nhưng bù lại nó sẽ giúp nâng cao tính bảo mật cho các tài khoản trực tuyến.
Phần tiếp theo của bài viết, sẽ hướng dẫn các bạn thiết lập xác thực thực 2 lớp để ssh vào VPS của bạn.
2. Thiết lập Google Authenticator
Để thực hiện thiết lập ta thực hiên các bước sau:
Bước 1: SSH vào VPS của bạn với quyền root
Bước 2: Thiết lập Google Authenticator:
- Cài đặt epel-release repo:
yum install -y epel-release

- Cài đặt pack google-authenticator :
yum install -y google-authenticator

- Sau khi cài đặt xong, ta cần tạo secret key:
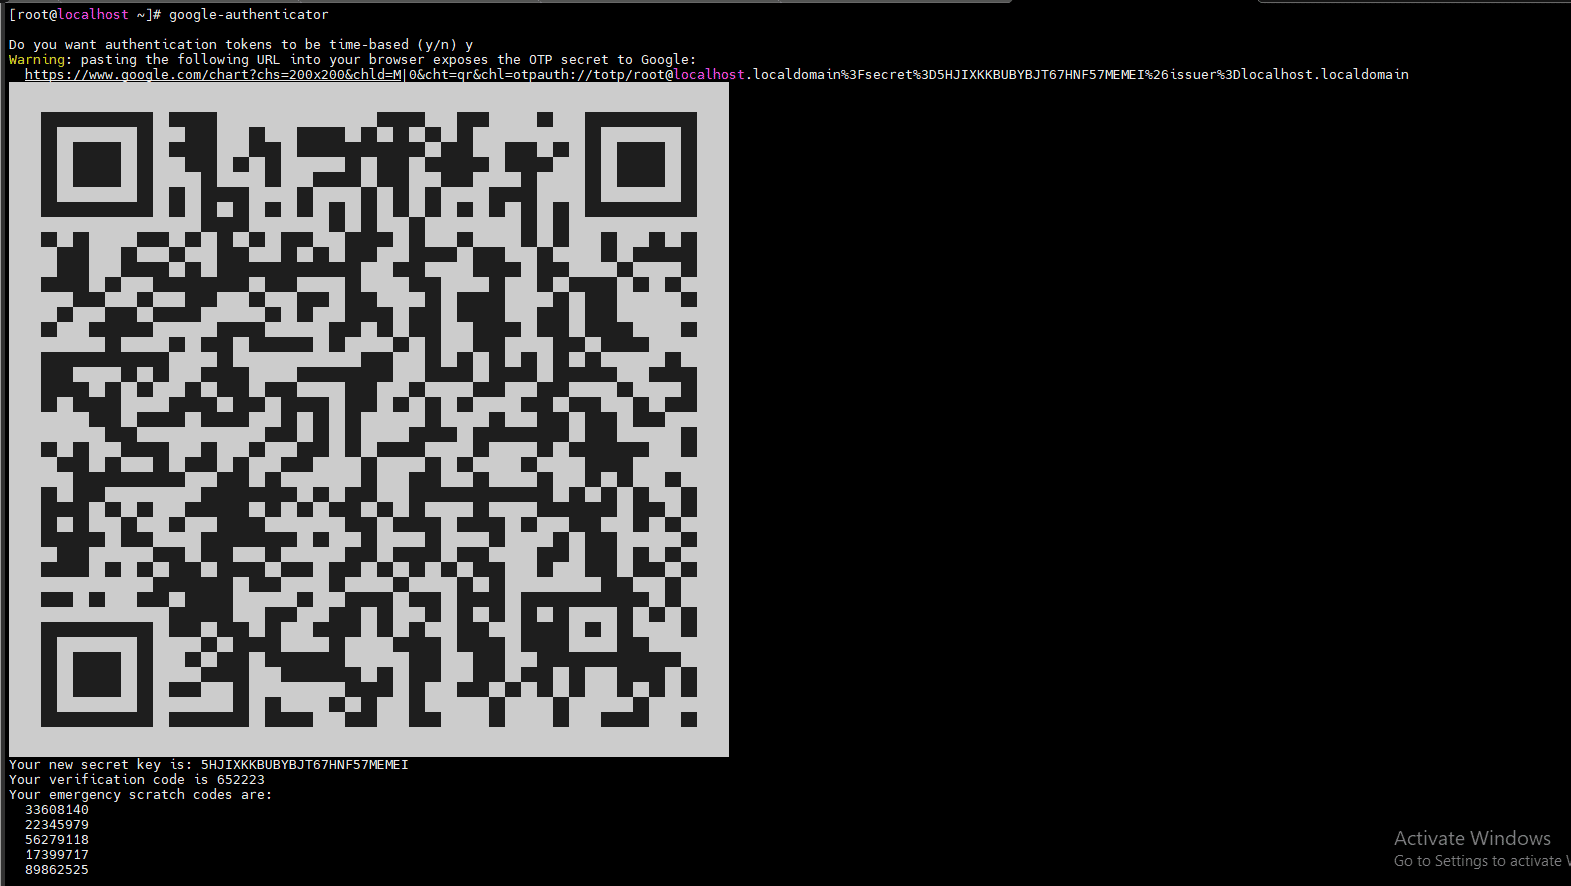
google-authenticator - Việc cần làm tiếp theo, xác nhận với những yêu cầu dưới đây và các bạn sẽ được cấp cho 1 mã QR
Do you want authentication tokens to be time-based (y/n) y
Warning: pasting the following URL into your browser exposes the OTP secret to Google:
Your new secret key is: 5HJIXKKBUBYBJT67HNF57MEMEI
Your verification code is 652223
Your emergency scratch codes are:
33608140
22345979
56279118
17399717
89862525
Do you want me to update your “/root/.google_authenticator” file? (y/n) y
Do you want to disallow multiple uses of the same authentication
token? This restricts you to one login about every 30s, but it increases
your chances to notice or even prevent man-in-the-middle attacks (y/n) yBy default, a new token is generated every 30 seconds by the mobile app.
In order to compensate for possible time-skew between the client and the server,
we allow an extra token before and after the current time. This allows for a
time skew of up to 30 seconds between authentication server and client. If you
experience problems with poor time synchronization, you can increase the window
from its default size of 3 permitted codes (one previous code, the current
code, the next code) to 17 permitted codes (the 8 previous codes, the current
code, and the 8 next codes). This will permit for a time skew of up to 4 minutes
between client and server.Do you want to do so? (y/n) y
If the computer that you are logging into isn’t hardened against brute-force
login attempts, you can enable rate-limiting for the authentication module.
By default, this limits attackers to no more than 3 login attempts every 30s.
Do you want to enable rate-limiting? (y/n) y
- Tiếp đó ta sử dụng App Authenticator và tiến hành Scan mã QR hiển thị ở VPS.
- Khi scan mã QR trên thì ta sẽ nhận được code gồm 6 chữ số, 6 chữ số này sẽ liên tục thay đổi sau 30 giây.
Bước 3: Thiết lập VPS để có thể xác thực qua Google Authenticator
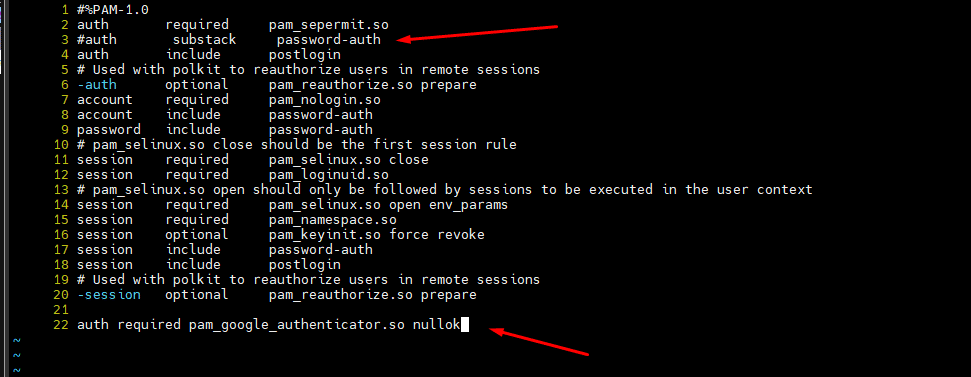
- Chỉnh sửa file:
vi /etc/pam.d/sshd - Commend dòng thứ 2:
auth substack password-auth
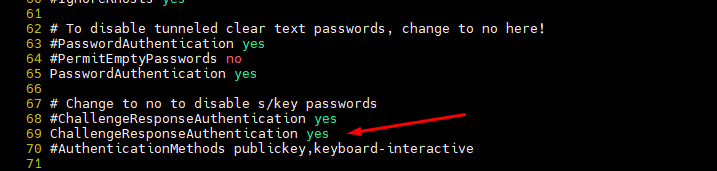
- Tiến hành chỉnh sửa file:
/etc/ssh/sshd_config- Tìm tới dòng ChallengeResponseAuthentication, chuyển từ no sang yes
- Khởi động lại dịch vụ ssh:
systemctl restart sshd
Bước 4: Kiểm tra dịch vụ Authenticator khi ssh
Khi ssh vào vps thì ta phải nhập mã OTP từ Google Authenticator App.

Vậy là mình đã thực hiện xác thực hai lớp thành công. Chúc các bạn may mắn.